Magnum and Kubernetes
Kubernetes clusters are deployed in OpenStack using Magnum, a container orchestration engine service.
In this guide, you will learn how to deploy a Kubernetes cluster using Horizon. The process this guide outlines is to first deploy the cluster, confirm the creation of the cluster, and finally demonstrate working with the Kubernetes cluster.
Get started by looking over the prerequisites required before the cluster can be created.
Magnum Heat Template Update
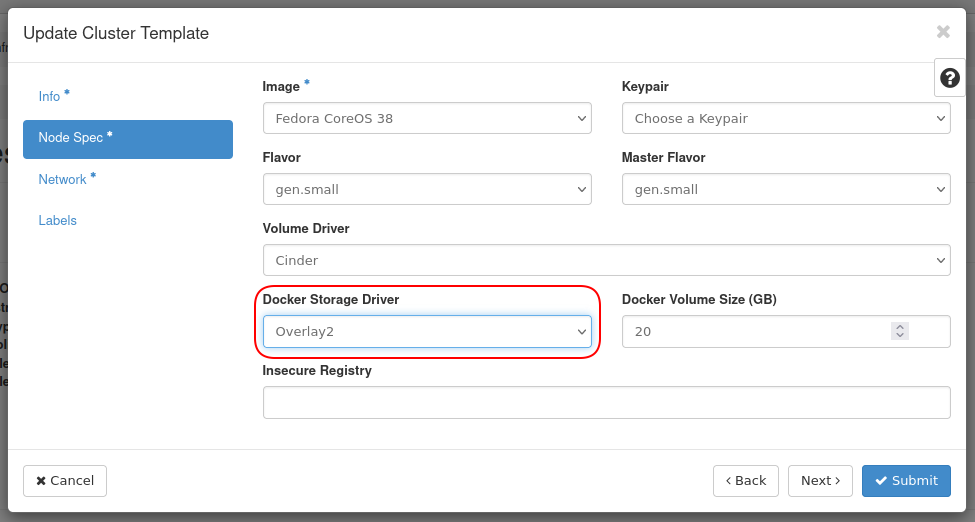
Kubernetes clusters will not deploy with our current Magnum Heat template.
The template will need to be updated to address this. This is because we specify
overlay as the Docker Storage driver, however overlay2 should be used, which
is recommended from Docker. OpenStack Heat does not support overlay2 as a
valid option, but Magnum does.
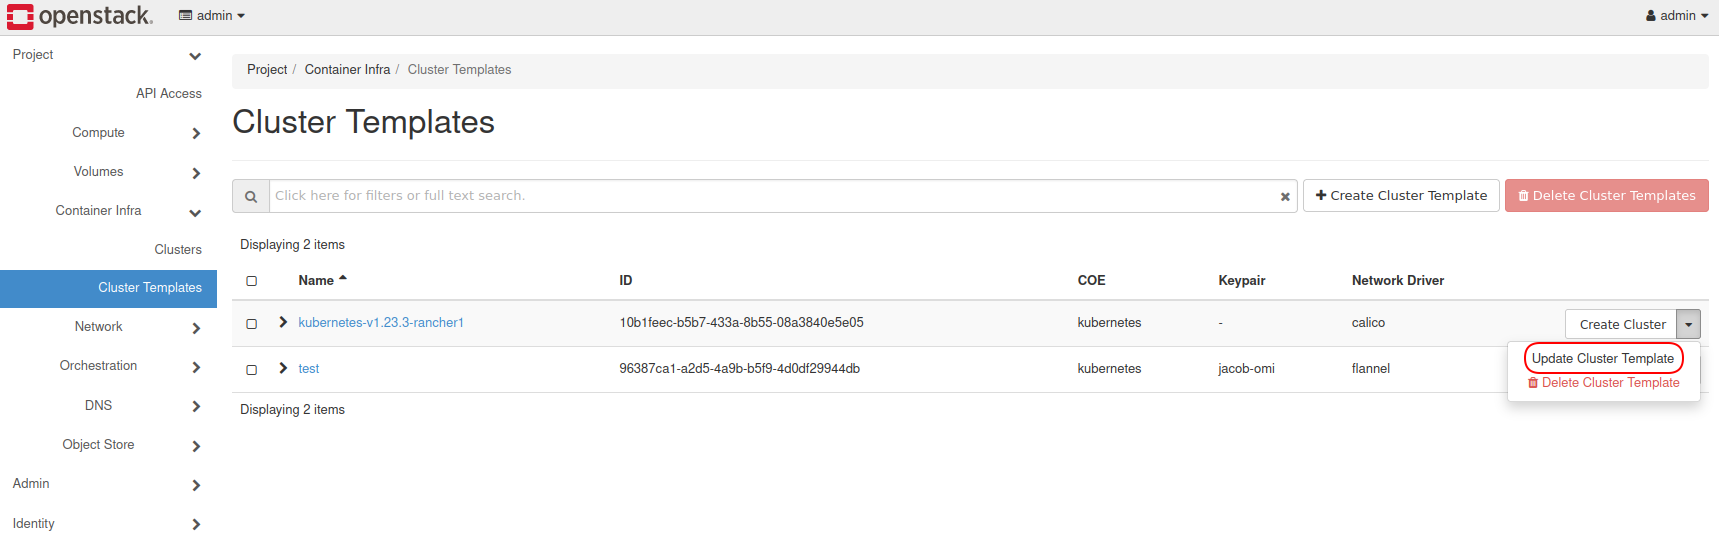
To correct this, in Horizon navigate to Project -> Container Infra -> Cluster
Templates, find the appropriate template, and adjust the value of Docker
Storage Driver to overlay2.
Kubernetes OpenStack Cloud Provider Integrations
In our Private Cloud Core platform, Magnum integrates with the Kubernetes OpenStack Cloud Provider. Presently, release-1.18 is used.
The following from the Kubernetes OpenStack Cloud Provider have been integrated:
Additionally, see Setting up HTTP Load Balancing with Ingress as a demonstration of setting up HTTP load balancing using Kubernetes and OpenStack.
Before Deploying Kubernetes
Project Roles
To create a Kubernetes cluster, you must either be the admin user, own
the current project, or your user must have the "Load Balancer Admin"
role.
Note -- The "Load Balancer Admin" role appears as
load-balancer_admin in Horizon.
This guide uses the user admin and is working out of the default
admin project.
Project Quotas
The project in which you are working needs to have enough resources available to it.
For example, spinning up a cluster with three masters and three workers
using the m1.small flavor requires the following resources:
- 6 Instances
- 6 VCPUs
- 24GB RAM
- 150GB Volume space
- 1 Network
- 1 Router
To see current project quotas, navigate in Horizon to Project -> Compute -> Overview.
To adjust project quotas, as a user with the admin role, navigate in
Horizon to Identity -> Projects, find the project in the list, and
from the drop down on the right, choose Modify Quotas.
You can also set quotas to -1 to allow unlimited of a resource type.
In this guide, the project's quotas are set to:
- Instances: -1
- VCPUs: -1
- RAM: -1
- Volumes: -1
OpenStackClient
This guide assumes OpenStackClient has been installed and pointed to the appropriate project. For information on how to install OpenStackClient, see How to Install and Use OpenStack's CLI.
To confirm the cluster status using the command line, OpenStackClient
requires the Python package python-magnumclient.
Install this package using:
pip install python-magnumclient
Procedure
Create Kubernetes Cluster
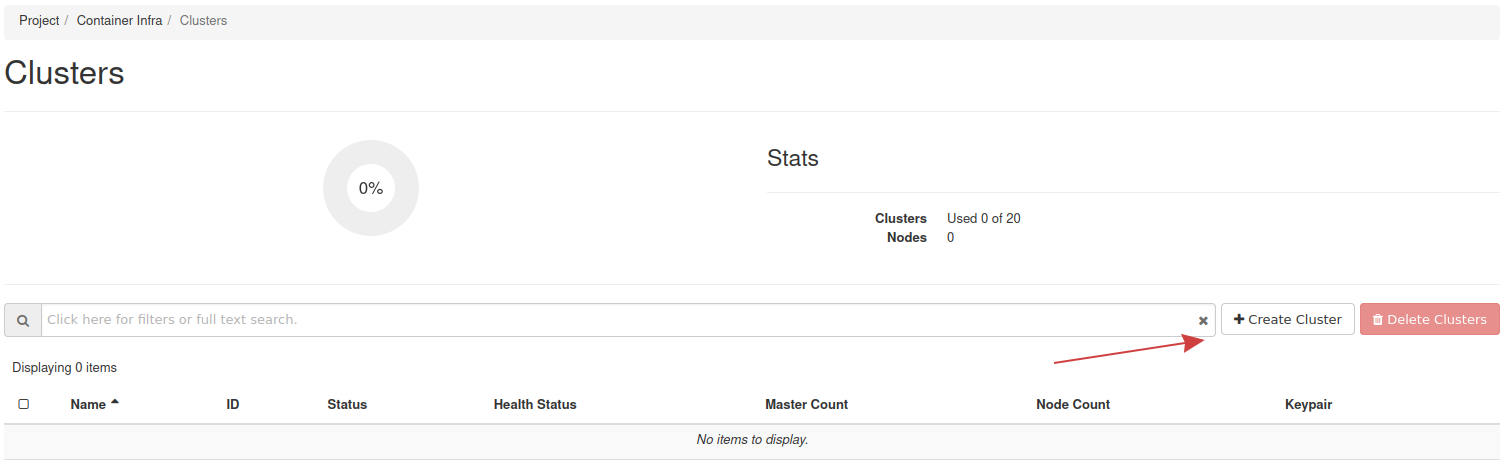
To create a Kubernetes cluster, navigate in Horizon to Project -> Container Infra -> Clusters, and follow the Create Cluster link.
Fill the form sections out as outlined in the following steps.
Step 1 -- Details
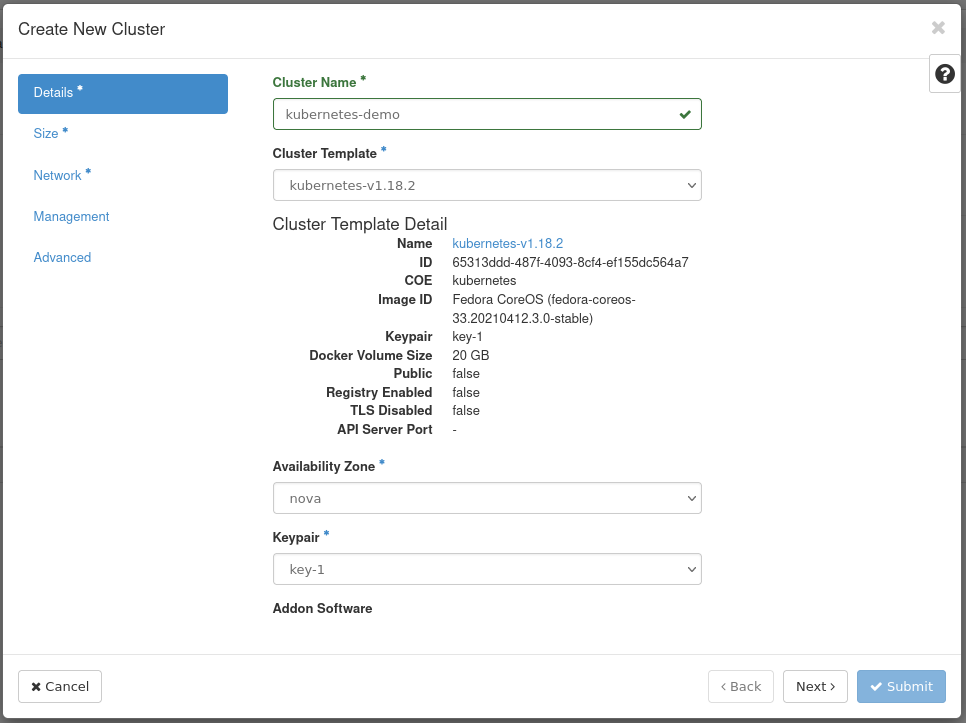
Fill out the following fields:
- Cluster Name --
kubernetes-demo - Cluster Template --
kubernetes-v1.18.2 - Keypair -- Your SSH key
Step 2 -- Size
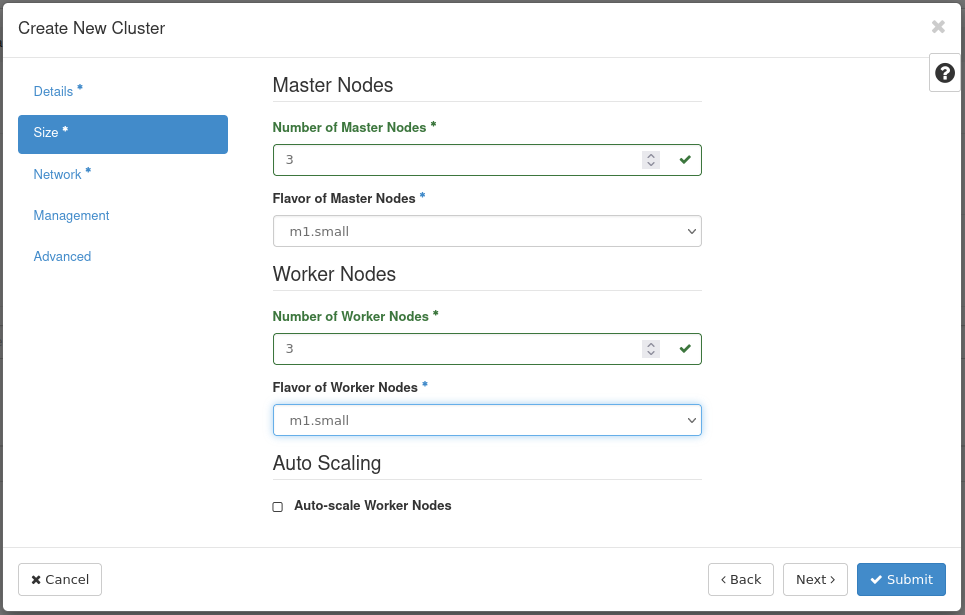
Fill out the following fields:
- Number of Master Nodes: 3
- Flavor of Master Nodes:
m1.small - Number of Worker Nodes: 3
- Flavor of Worker Nodes:
m1.small
Step 3 -- Network
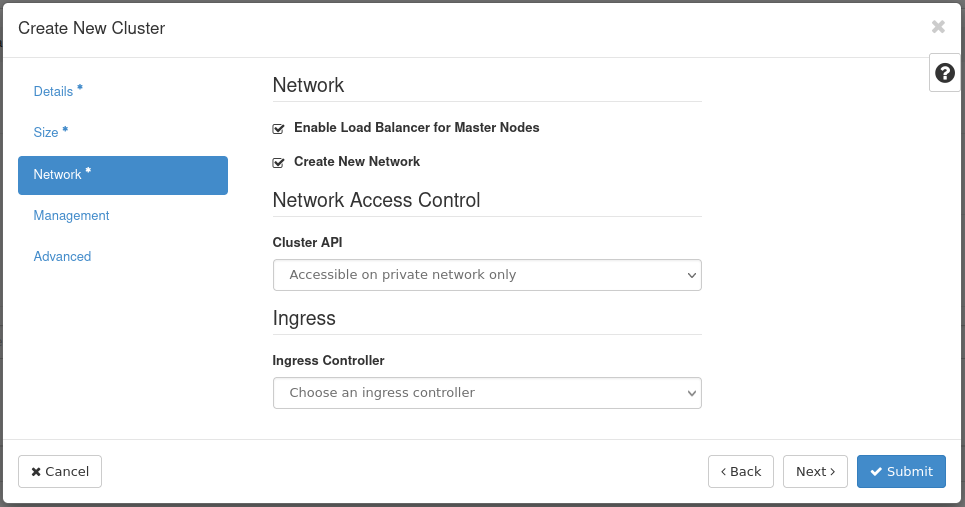
Fill out the following fields:
- Enable Load Balancer for Master Nodes: Ensure this is checked
- Create New Network: Ensure this is checked
- Cluster API: Ensure "Accessible on private network only" is selected
Step 4 -- Create Cluster
You can now create the Kubernetes cluster. Allow 10 - 15 minutes for cluster creation.
Once the form is submitted, you will be taken back to the cluster list
where you will see the cluster being created with Status,
CREATE_IN_PROGRESS:

Check Status of the Kubernetes Cluster
This section explains how to check the status the Kubernetes cluster using OpenStackClient.
Prepare OpenStackClient
Before beginning, ensure OpenStackClient is installed and pointed to the appropriate project.
Install python-magnumclient
Next install Magnum's CLI, python-magnumclient using pip:
pip install python-magnumclient
List Heat Stacks
Next, you will need to list the Heat stacks. This output includes the Kubernetes stack created previously.
List Heat stacks using openstack stack list:
$ openstack stack list
+--------------------------------------+------------------------------+--------------------+----------------------+--------------+
| ID                                   | Stack Name                   | Stack Status       | Creation Time        | Updated Time |
+--------------------------------------+------------------------------+--------------------+----------------------+--------------+
| 545b100b-ba3c-4366-9d68-eca7b1df98b6 | kubernetes-demo-ojlnzq4w252q | CREATE_IN_PROGRESS | 2021-06-14T21:19:35Z | None         |
+--------------------------------------+------------------------------+--------------------+----------------------+--------------+
You should see the stack created previously appended with random
characters. In this example, the stack is named
kubernetes-demo-ojlnzq4w252q. Take note of the name as it will be used
in the next section.
OpenStack uses Heat for template-based orchestration.
Check deployment status
To check the status of the deployment, use
openstack stack resourcelist <stack-name>,
where <stack-name> is the name of the stack.
Check status of stack kubernetes-demo-ojlnzq4w252q:
$ openstack stack resource list kubernetes-demo-ojlnzq4w252q
+-------------------------------+--------------------------------------+--------------------------------------------------------------------------------------+--------------------+----------------------+
| resource_name                 | physical_resource_id                 | resource_type                                                                        | resource_status    | updated_time         |
+-------------------------------+--------------------------------------+--------------------------------------------------------------------------------------+--------------------+----------------------+
| kube_cluster_deploy           |                                      | OS::Heat::SoftwareDeployment                                                         | INIT_COMPLETE      | 2021-06-14T21:19:35Z |
| kube_cluster_config           |                                      | OS::Heat::SoftwareConfig                                                             | INIT_COMPLETE      | 2021-06-14T21:19:35Z |
| secgroup_rule_tcp_kube_minion | 4a76ee7a-dde2-4190-9ccf-6a144d7d42a4 | OS::Neutron::SecurityGroupRule                                                       | CREATE_COMPLETE    | 2021-06-14T21:19:35Z |
| api_address_floating_switch   |                                      | Magnum::FloatingIPAddressSwitcher                                                    | INIT_COMPLETE      | 2021-06-14T21:19:35Z |
| kube_minions                  |                                      | OS::Heat::ResourceGroup                                                              | INIT_COMPLETE      | 2021-06-14T21:19:35Z |
| etcd_address_lb_switch        |                                      | Magnum::ApiGatewaySwitcher                                                           | INIT_COMPLETE      | 2021-06-14T21:19:35Z |
| api_address_lb_switch         |                                      | Magnum::ApiGatewaySwitcher                                                           | INIT_COMPLETE      | 2021-06-14T21:19:35Z |
| kube_masters                  | 2f5b992c-c15e-4650-95e4-c7348efc7f7e | OS::Heat::ResourceGroup                                                              | CREATE_IN_PROGRESS | 2021-06-14T21:19:35Z |
| etcd_lb                       | 3a8df57f-2f43-4af1-9248-bd886c392344 | file:///usr/lib/python3.6/site-packages/magnum/drivers/common/templates/lb_etcd.yaml | CREATE_COMPLETE    | 2021-06-14T21:19:35Z |
| api_lb                        | 2455a996-b772-4664-b99e-c7a67ca9285b | file:///usr/lib/python3.6/site-packages/magnum/drivers/common/templates/lb_api.yaml  | CREATE_COMPLETE    | 2021-06-14T21:19:35Z |
| network                       | 90947279-ec72-4ed6-9e62-6e5501e0bd1d | file:///usr/lib/python3.6/site-packages/magnum/drivers/common/templates/network.yaml | CREATE_COMPLETE    | 2021-06-14T21:19:35Z |
| worker_nodes_server_group     | d135f907-5e8e-4a2c-b3fd-397418837d8d | OS::Nova::ServerGroup                                                                | CREATE_COMPLETE    | 2021-06-14T21:19:35Z |
| secgroup_rule_udp_kube_minion | c0892f17-4d46-403b-9cf9-6e89d95bc0f1 | OS::Neutron::SecurityGroupRule                                                       | CREATE_COMPLETE    | 2021-06-14T21:19:35Z |
| secgroup_kube_minion          | 8d130ac5-c356-43d9-bdcb-a7b779610638 | OS::Neutron::SecurityGroup                                                           | CREATE_COMPLETE    | 2021-06-14T21:19:35Z |
| secgroup_kube_master          | 6e52a531-762a-4f29-b85f-c149c5b461f1 | OS::Neutron::SecurityGroup                                                           | CREATE_COMPLETE    | 2021-06-14T21:19:35Z |
| master_nodes_server_group     | f2235409-575e-4fb8-b3b8-cde0fc1ed9da | OS::Nova::ServerGroup                                                                | CREATE_COMPLETE    | 2021-06-14T21:19:35Z |
+-------------------------------+--------------------------------------+--------------------------------------------------------------------------------------+--------------------+----------------------+
Once the column resource_status reflects CREATE_COMPLETE for all
items, the Kubernetes deployment is done.
It will take around 10 to 15 minutes for everything to finish deploying.
Kubernetes deployed by Magnum is handled by a series of Heat stacks.
Note! You cannot move on with this guide if the deployment is not completely finished.
Test Kubernetes Cluster
Once the deployment is complete, you can test the Kubernetes cluster. This section briefly explains how to do this.
The following steps are all run in a local development, or testing, environment and assumes OpenStackClient is installed and pointed to the appropriate project.
Obtain a copy of
kubectland make it executable:curl -LO "https://dl.k8s.io/release/$(curl -L -s https://dl.k8s.io/release/stable.txt)/bin/linux/amd64/kubectl"
chmod +x kubectlCreate testing directory:
mkdir k8s-testObtain cluster configuration:
openstack coe cluster config --dir k8s-test kubernetes-demoSet the
KUBECONFIGenvironment variable by executing the output of the previous step:export KUBECONFIG=/home/<user>/k8s-test/configInteract with the cluster using
./kubectl get svc -A.
For example:
$ ./kubectl get svc -A
NAMESPACE     NAME                            TYPE        CLUSTER-IP
EXTERNAL-IP   PORT(S)                  AGE
default       kubernetes                      ClusterIP   10.254.0.1
<none>        443/TCP                  115m
kube-system   csi-cinder-controller-service   ClusterIP   10.254.98.104
<none>        12345/TCP                114m
kube-system   kube-dns                        ClusterIP   10.254.0.10
<none>        53/UDP,53/TCP,9153/TCP   115m
How to Resize a Kubernetes Cluster's Node Count
At present, there is an issue with resizing a Kubernetes cluster's node count using Horizon. To perform this task, you must perform the action over SSH using OpenStackClient.
Resize Prerequisites
Before preparing OpenStackClient, ensure a user with the admin role is associated with the project under which the Kubernetes cluster exists. Next, download the OpenStack RC file for the appropriate project and user. Finally, source this file to prepare your local shell.
This guide assumes OpenStackClient has been installed and pointed to the appropriate project. For information on how to install OpenStackClient, see How to Install and Use OpenStack's CLI.
In addition, python-magnumclient needs to be installed to work with
the Kubernetes cluster. This can be installed using pip install
python-magnumclient.
Once the environment is prepared, you can issue the command to resize the cluster.
Resize Procedure
To resize the cluster, you need to first list all clusters to get the UUID.
For example:
openstack coe cluster list
From the above output, copy the cluster's UUID.
To resize a cluster to 3 nodes for example, use the following command,
where <cluster-uuid> should be replaced with the actual UUID:
openstack coe cluster resize <cluster-uuid> 3
Troubleshooting
This section will be filled as common failure scenarios and solutions are collected. For general troubleshooting see the Magnum Troubleshooting Guide from OpenStack's documentation.